How to Scan a Book at Home and edit it in easy steps?
We have written an article about how to scan a book without damaging it here and don’t worry, we are not writing the same article now. There are different types of scanners and ways of scanning different kinds of materials.
In this article let us try to understand how we can scan a book or a document with text in it and convert them to a searchable PDF. We have interesting sections to go ahead and it will make us feel happy trying to go through these methods converting into searchable PDFs. How do we scan a book to PDF and make it searchable?
Scan through a scanner, convert the scanned images to a PDF. This PDF will be an image PDF. To make it searchable, run OCR (Optical Character Recognition) engine and you have a searchable PDF.
Let us now go through the steps involved after gathering enough knowledge to run through the steps. The first knowledge we have to gain when it comes to scanning books is regarding the types of scanners that can help us do this.
Types of Scanners
There are several types of scanners. You can go through them one by one here in this article. After going through the article let us figure out the scanners that help us scan books and nothing else.
From our experience, there are two types of scanners that can help us do this task.
Overhead Scanner

Similar to what we have already written in the article on how to scan books without damaging them, we will have to scan the books in this fashion if they are not to be damaged or destroyed. This type of scanning is also known as non-destructive scanning or intact scanning. The books are preserved intact while we scan them ensuring that the book will be the same way how it came to us.
This is the conventional way of scanning books that many people out there have no idea about. Let us move on to the next section, what most of the service providers do, but forget on the quality. But don’t worry, we will not compromise on the quality.
Automated Document Feeder

We have written a small introduction about this in the same article where we have mentioned the types of scanners. But because we have not elaborated there, let us discuss it here in this section.
The ADF scanner that we use is a Kodak Scanner. In this segment, there are many other companies, and all of them are listed below and are equally capable.
- Canon
- Fujitsu
- Epson
Using the Overhead Scanners and Automated Document Feeders, let us see in the coming section, the different ways of scanning.
Ways of Scanning
With the two scanners that we have mentioned in the earlier section, there are obviously two ways, one from each scanner that constitutes the ways of scanning. Out of the two, we have already explained one of them in the “How to Scan a book without Damaging it” article.
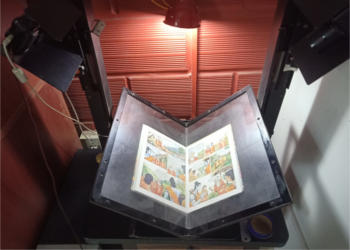
As an overview, while scanning the non-destructive way, we place the book under two overhead cameras that capture the photos of each side of the book. These captured images will be stored directly on the hard disk. Ideally, the scanning software has to control the cameras seamlessly from the computer, like:
- Zooming
- Changing ISO
- Setting Focus
- Controlling Flash
The software does all this action using the drivers of the camera. The images will be stored in a series in the destination path that is provided at the beginning of the scanning.
Once the images are stored in the hard disk, they have to be post-processed. This can be done using some open-source software, where batch processing is enabled.
Let us now only concentrate on the other way of scanning which is done using the Automated Document Feeders. As we have told earlier that we use Kodak Scanners, and in this article, we use the drivers and software of the same scanner and show a step-by-step guide as to how to scan a book.
This type of scanning is also known as destructive scanning as there will be a process of cutting open the spine of the book.
The book should be cut by first opening the cover of the book. Once the cover is opened, make sure that the book is not an old one. If it is old, see to it there are no staples used to bind the book. Any staple you see, remove them as they will harm the book cutter at a later stage.
After cutting open the spine of the book, it is the same as scanning documents. All you have to do is insert them in the feeder while the feeder sucks each page, scans them, and places them in the output area of the ADF scanner. You should not be surprised as most of the scanners scan both sides of a page and stores them in the computer one after the other.
Note that this might not be the same with all ADF scanners. Only production scanners that are used by companies where there are too many pages to scan use such kinds of scanners that scan either side of the page. If the ADF scanner does not come with dual page scans, then that part has to be done manually. We will be speaking about it in the next section.
Let us see in the next section, how to scan a book using the destructive method, which is a lot easier and comes with great quality.
How to Scan using Destructive Method
As we have already given an idea as to how the scanning works, let us go a little into detail. The scanner that we will be using for this discussion is Kodak i2400.
As you can see that we have placed the papers on the feeder. Before we scan, let us go through the drivers and the software that works in the background.

First, install the drivers. After installing the drivers, make sure that the scanner is available in the devices list and is enabled. After installing the drivers the software goes into the computer. In Kodak, the software is divided into two parts of which the latter part is not even discussed here.
The first part uses software called “Smart Manager”. This sits on top of the taskbar near the date in windows. if we click on it there will be quite a number of options that it will show up. Let us discuss it one by one here.

Starting from the beginning, the options, 1. Color, 2. Black and White PDF are all “Scan Actions” that we can perform by clicking on them. The reason for starting with numbers can be understood better by looking at the scanner.
If you observe the scanner, there is a number that is getting displayed from the LED display. It is currently showing “1“. There are three buttons below the number. Three arrows:
Top Arrow: To change the number incrementing it ranging from 1 to 10
Bottom Arrow: To change the number decrementing it ranging from 10 to 1
Right Arrow: To run the scanner
If you come back to the software image, you will now better understand the concept.
Now, if you see the actions again, the number that is corresponding to the software is the same number that is getting displayed in the scanner.
Consider the scenario. The scanner led is displaying “1“. If we run the scanner by tapping the right arrow in the scanner, we are telling the scanner to run the function that is assigned to the function in the software.
To understand it better, let us get into the option Configure in the above menu.

Here we can assign the functions to the number, like:
- What format the image has to be stored in
- The path where the images have to be stored
- Image name (date – sequence number)
- Any prefix that we have in our mind
- If we want to edit the images before saving them
- Should the feeder wait for us till we insert more pages
- Do we want to add any keyword to the document
- Do we want to separate the PDFs that are before and after the blank sheet
Further, there are advanced options if we get inside the settings.

Here, we can select the:
- Type of image, Gray-scale, Color, or Black and White
- Do the pages we are scanning have graphics or just text
- The quality of the paper, like thickness, finish (glossy, matte)
- The Resolution of the page
- The format of the page
- How compressed the image should be

Some more advanced options like:
- Having the option to straighten the pages when they rotate while getting scanned
- Should the entire document has to be scanned or a part of the document or custom size
- Should the software remove the black parts of the pages while scanning and add white patches to them
- Do we have to rotate the pages post scanning

- Controlling the brightness and contrast of the pages manually or automatically
- To what extent the pages have to be sharpened
- If the background has to be added with some white space making them look better

- Should the holes if any existing in the paper be filled automatically?
- What percentage of the page should be filled to be considered blank?
- Should the edge of the image be filled with white color?
- If the page has any disturbance the the software should consider removing?
- Any specific color to be dropped out from the page?
These are the functions that can be assigned to a number and this can be executed right from the scanner simply by entering that number from the scanner LED using the up and down button. After selecting, if we run the scanner machine by tapping the run button, it scans the pages with the above options enabled.
Before inserting sheets into the feeder, make sure that the pages are cut properly without two or more sheets stuck to each other. This will either lead to sucking of multiple sheets by the feeder or the sheets might get jammed in the process. Scanning does not stop with getting the images of the pages, it also involves the enhancement of pages that comes in postprocessing.
For more book scanning ways, you can read this article here.
Post-processing
After the processing of scanning the pages, the pages of the books have to be enhanced. The best tool so far, which is open source is “ScanTailor“.
You can view in detail, how to remove the gray or brown background from a page and convert them to black and white in this article here.
You can download this software from the following link:
https://scantailor.org/downloads/
How to Convert the enhanced pages to PDF?
Once the pages are enhanced, the next step is to convert them to PDF. There are several tools out there that can convert the pages to PDF. We recommend the open-source software called PDFill. This has the most essential editing tools with which PDFs can be created, split, deleted, converted back to images, so on and so forth.
To use the software you can download from the link below:
http://www.pdfill.com/whatisnew.html
You can read this article to find out how to convert the images into PDF using PDFill tools.
What is OCR (Optical Character Recognition)
If you are looking out for an article that extracts contact details from a business card and stored them as Google Contacts, Excel, or Outlook, please read the article here.
Now that we have a PDF file ready, it is time to convert it to a searchable PDF. What is the difference between a searchable PDF and an Image PDF?
An image PDF is a type of PDF that is created by assembling a set of images. They are not yet searchable or we can’t even have the cursor select the text. They are just images that are still a few million pixels together.
To convert these images to text the software or the engine that is run on the images on the already created PDF is called OCR (Optical Character Recognition). These, as the name indicates, read the images pixel by pixel and recognizes the text or characters in the images.
Enable Search Operations in PDF
Once it recognizes, it converts the known alphabets in the form of pixels to text. After it gets converted if we export it to a text PDF, they become searchable PDFs.
This is just a brief explanation as to how to convert an image PDF to a text PDF. We will soon come up with an article on how to export step by step using the software.